
Introduction of how to collect a soil sample for soil testing
I remember a farmer from a nearby village, Ramesh Kaka. For years, he was stuck in a cycle. Har saal, without fail, he’d apply two bags of Urea and one bag of DAP per acre. When I asked him why, he simply said, “Sab yahi daalte hain, hum bhi yahi daalte hain.” (Everyone uses this, so I do too). Yet, his yields were dropping and the soil was getting harder.
This story isn’t just about Ramesh Kaka; it’s the story of countless farmers who rely on guesswork. But what if you could ask your soil exactly what it needs? What if you could give it the precise nutrition it’s craving?
That’s where soil testing comes in – it’s like a ‘health report’ for your farm. But a reliable report begins with one crucial first step: a perfect sample. The entire accuracy of your soil test depends on the soil sampling procedure you follow. A small mistake here can lead to wrong recommendations, wasted money, and continued poor crop health.
In this guide, we’ll break down how to collect a soil sample for soil testing process into simple, actionable steps. We will cover everything you need to know, from the basic soil sampling tools like a khurpi to more professional ones like a soil sampling auger. We’ll focus on the standard method for fertility testing, and also touch upon how scientists collect special undisturbed soil samples for physical soil analysis. We’ll even share several soil sample collection images along the way to make things crystal clear.
Why Soil Sampling is a Non-Negotiable Step for Smart Farming

So, you might be thinking, “Itna kaam kyu karna? Why go through all this trouble?” The answer is simple. Collecting a soil sample isn’t an expense or a hassle; it’s the single most important investment you can make in your farm. Let’s break down why it’s so critical.
A properly collected soil sample gives a true picture of soil fertility. This data allows farmers to decide:
How much fertilizer to apply?
Which nutrient is deficient?
When and where to add organic manures?
It's Your Farm's "Health Report Card" 🩺
Think of it this way: when you feel sick, you don’t just start taking random medicines, right? You go to a doctor who first asks for a blood test. A soil test is exactly that—a health report card for your farm. It tells you the exact condition of your soil:
Which nutrients are high or low (Nitrogen, Phosphorus, Potassium).
Whether your soil is acidic or alkaline (its pH level).
How much organic matter it contains.
Without this report, you are farming blind.
Tools Required for Soil Sample Collection
Look, whenever someone asks me, “What tools do I need for soil sampling?”, I always say this: the right tools can make or break your soil sample. If your tools aren’t proper, your lab results can be completely misleading. Over my 10+ years of experience, I’ve seen both farmers and students ignore this small but critical detail – and trust me, it costs them later.
A Khurpi or Spade: This will be your most valuable tool. Honestly, 99% of the time, a clean spade or a small hand trowel (khurpi) is all you need to do a perfect job. It’s ideal for making that ‘V-shaped’ cut we’ll talk about later.
A Soil Sampling Auger: Now, this is a more professional tool. A soil sampling auger is designed to pull a perfect, uniform core of soil from the ground. It’s fantastic if you have one or can borrow it, especially for compacted or hard soils. But is it absolutely necessary? Not at all. You can get excellent results without it.
A Clean Plastic Bucket: I can’t stress the word “clean” enough. Please, trust me on this, and never use a bucket that has held fertilizer, manure, or any kind of chemical. Even a tiny amount of residue can contaminate your entire sample and lead to a completely inaccurate report.
A New Plastic Bag: The same rule applies here. Your sample is heading to a laboratory for analysis, so it has to be pure. A fresh, clean plastic bag is your best bet for storage and transport.
A Permanent Marker and a Label: This is a step you should never skip. I’ve seen many people collect samples from 3-4 different fields and then completely forget which bag came from which field. All their hard work is wasted! Just take a moment to label the bag right there in the field with your name, the field’s ID, and the date of collection.


When to Collect Soil Sample? (Best Time)
Timing is everything when it comes to soil sampling. Believe me, I’ve seen students and farmers collect soil at the wrong time, and their lab results end up completely off. Over my 10+ years in agriculture, I can tell you that collecting at the right time ensures you get accurate readings and proper fertilizer recommendations.
1. Before Sowing the Crop
The most ideal time to collect a soil sample is before planting. This helps you understand what nutrients your soil lacks and plan fertilizer application accordingly. Waiting until after crops are grown can give misleading results because nutrients may already be consumed by the plants.
2. Avoid Sampling Immediately After Fertilizer or Manure Application
If you just applied fertilizer or organic manure, wait for at least 3–4 weeks before taking a sample. Otherwise, nutrient levels in your sample will be artificially high, and lab recommendations won’t reflect the real status of your soil.
3. Best Season for Sampling
Summer / Dry Season: Fields are accessible, soil is easy to handle, and results are reliable.
Post-Harvest: Another good time, especially if you want to test before the next crop season.
4. Depth Considerations
When sampling, different crops need different depths:
Field crops: 0–15 cm
Horticultural crops / Orchards: 0–30 cm
Using a soil sampling auger makes this process easy and ensures your sample is undisturbed, giving the lab a true picture of your soil’s fertility.
Step-by-Step Process how to collect a soil sample for soil testing
Alright, my friend, this is where the action happens. We’ve talked about the ‘why’ and the ‘when’, now let’s get to the ‘how’. Don’t be intimidated; this soil sampling procedure is very straightforward. Just follow these steps, and you’ll have a perfect sample ready for the lab.
Step 1: Map Your Field & Choose Your Path
First, look at your field. If the entire area is uniform—meaning the soil type, slope, and past crops are all the same—you can treat it as one “sampling unit.” If you have a large field with a rocky patch and a flat, loamy patch, you should treat them as two separate units and take two separate samples.
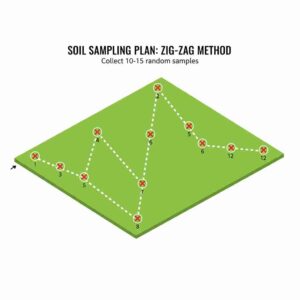
Once you’ve defined your area, you need to walk it in a random pattern. The best way is to use a Zig-Zag or a ‘W’ pattern. This ensures you collect sub-samples from all over the field, not just from the edges or the center. Aim to collect from about 10-15 different spots along this path.
Step 2: Clean the Surface at Each Spot
At each of the 10-15 spots you’ve chosen, use the side of your shoe or your khurpi to scrape away any surface litter. This means removing grass, weeds, stones, old crop stalks, or manure. You want to sample the soil where the crop roots actually grow, and this surface debris can throw off your results.
Step 3: Make the 'V-Shaped' Cut
Now, take your spade or khurpi and dig a ‘V’-shaped hole into the soil. For most field crops like wheat, corn, or soybeans, this hole should be about 6 inches (15 cm) deep. This depth represents the primary root zone where the plant gets most of its nutrients.

Step 4: Collect a Thin, Uniform Slice
Once you have your ‘V’ hole, the next step is to take the actual sub-sample. From one of the smooth, flat sides of the ‘V’, carefully take a 1-inch thick slice of soil from the top all the way to the bottom. This is the most critical step. You want a consistent slice, not just a scoop from the top or bottom. Place this slice into your clean bucket.
Pro-Tip: If you happen to be using a soil sampling auger, this step is even easier. You just push the auger into the ground to the required depth, twist it, and pull out a perfect soil core.
Step 5: Repeat and Create a "Composite Sample
Now, simply repeat Steps 2, 3, and 4 at all the other 10-15 spots you identified on your zig-zag path. Put every single slice (sub-sample) into the same bucket.
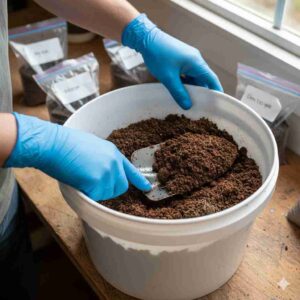
Once you have all your sub-samples, break up any large clumps and mix the soil in the bucket thoroughly. This combined sample is called a “composite sample.” It’s essential because the lab will only test a few grams of it, and you want that tiny amount to represent the entire field accurately.
Step 6: Prepare the Final Sample for the Lab
You’ll now have a bucket with several kilos of mixed soil, which is too much to send. Spread the soil onto a clean plastic sheet or newspaper in a shaded area (never in direct sunlight, as it can alter the results).
Divide the pile into four equal quarters. Discard two opposite quarters, mix the remaining two, and repeat the process until you have about half a kilogram (500g) of soil left. This is your final sample.
A note for the curious: The method we just used provides a mixed, or ‘disturbed’, sample, which is perfect for nutrient testing. This is different from collecting undisturbed soil samples, a special technique used by soil scientists to study soil structure and density.
And there you have it! You’ve just collected a soil sample like a professional. The hardest part is officially over.
Common Mistakes to Avoid in Soil Sampling
DON’T sample from unusual spots. It’s tempting to grab soil from an easy-to-reach spot, but you must avoid areas that aren’t representative of your whole field. This includes spots right next to fences, gates, trees, water channels, compost piles, or areas where fertilizer is usually stored or mixed. These “odd spots” have different nutrient and moisture levels and will skew your results. Stick to your zig-zag pattern in the main body of the field.
DON’T use contaminated tools or bags. This is a critical one. Never, ever use a rusty spade, a bucket that recently held fertilizer or chemicals, or an old fertilizer sack to collect your sample. The tiny residue of chemicals or rust (iron) can contaminate your sample, leading to a false high reading in the lab report. Always use clean tools and a new plastic bag.
DON’T take a shallow sample. Scraping just the top inch or two of soil is a classic rookie mistake. Most crop roots are active in the top 6-inch layer of soil. If your sample is too shallow, you’re not getting a true picture of the nutrient supply in the root zone. Make sure your ‘V’-shaped cut goes down to the proper depth.
DON’T forget to mix the composite sample thoroughly. Remember how you collected 10-15 sub-samples in your bucket? The goal is to create one single “composite sample” that represents the entire field. If you don’t mix all that soil together thoroughly before taking your final half-kilo sample, you might accidentally scoop up soil from just one or two of the spots, which defeats the whole purpose.
DON’T forget to label the bag immediately. Trust me, after a long day, it’s easy to forget which sample came from which field. As soon as you’ve packed your final sample, take a permanent marker and label the bag with your name, the field name or number, and the date. It takes ten seconds and saves you from a major headache later.
FAQs on how to collect a soil sample for soil testing
For most field crops (like wheat, corn, cotton, vegetables), a depth of 6 inches (or 15 cm) is standard. This is the main “plow layer” where most of the roots are active.
For deep-rooted crops or fruit orchards, you should take samples from different depths. It’s often recommended to take one sample from the top 6 inches and a separate one from the 6-12 inch depth to get a more complete picture of the root zone.
You don’t need to do it every single season. A good rule of thumb is to test your soil once every 2 to 3 years for a particular field. This is frequent enough to track changes in your soil’s fertility and pH levels, allowing you to adjust your fertilizer plans without it becoming an excessive burden.
After mixing all your sub-samples and using the “quartering method” to reduce the pile, you only need to send about half a kilogram (500 grams) of soil to the lab. This small amount is more than enough for them to run all the necessary tests.
Of course. Here is a helpful FAQ section to address the most common questions that come up about soil sampling.
Frequently Asked Questions (FAQs) on Soil Sampling
Here are answers to some of the questions I hear most often from farmers and students.
1. How deep should I take the soil sample?
This is a great question, and the answer depends on the crop you’re growing.
For most field crops (like wheat, corn, cotton, vegetables), a depth of 6 inches (or 15 cm) is standard. This is the main “plow layer” where most of the roots are active.
For deep-rooted crops or fruit orchards, you should take samples from different depths. It’s often recommended to take one sample from the top 6 inches and a separate one from the 6-12 inch depth to get a more complete picture of the root zone.
2. How often should I get my soil tested?
You don’t need to do it every single season. A good rule of thumb is to test your soil once every 2 to 3 years for a particular field. This is frequent enough to track changes in your soil’s fertility and pH levels, allowing you to adjust your fertilizer plans without it becoming an excessive burden.
3. How much soil do I need to send to the lab?
After mixing all your sub-samples and using the “quartering method” to reduce the pile, you only need to send about half a kilogram (500 grams) of soil to the lab. This small amount is more than enough for them to run all the necessary tests.
4. What about those DIY home soil testing kits? Are they reliable?
Home testing kits can be useful for a quick, general idea of your soil’s pH and N-P-K levels. However, they are not as accurate or comprehensive as a professional lab test. A lab will give you precise readings and also test for crucial micronutrients (like Zinc, Boron) and organic carbon content, which most DIY kits don’t. My advice? Use a DIY kit for a quick check, but for serious fertilizer planning, always trust a lab report.
The cost can vary depending on your location and the lab you choose. However, tests at government labs, Krishi Vigyan Kendras (KVKs), or agricultural universities are very affordable. In most cases, the cost of a complete soil test is less than the price of a single bag of fertilizer. It’s a very small price to pay for information that can save you thousands in the long run.
Related post on agrigramodaya

👉Top 100 Crop Improvement in Rabi Crops MCQs + Fill in Blanks + One Liners (Exam Special)
Crop improvement in rabi crops MCQs is one of the...
Read More
👉 Diseases of Field and Horticultural Crops MCQs True/False, fill in the blanks (With Answers for BSc Agriculture)
Diseases of field and horticultural crops are one of the...
Read More
80+ Post Harvest Management MCQs, Fill in the Blanks & Short Questions (Exam-Oriented)
Post harvest management is one of the most important units...
Read More
R.S. Singh Plant Diseases Book PDF: The “Gift” for Plant Pathology Students
Table of Contents If you are a BSc Agriculture student,...
Read More
Nemraj Sunda 15th Edition PDF Download Free : Is It Still the Ultimate Guide for Agri-Exams?
Table of Contents If you have ever stepped into an...
Read More
Fundamentals of Genetics by B.D. Singh Book PDF: A Comprehensive Review & Why It’s a Must-Have for Agri Students
Let’s be honest for a second—when most of us join...
Read MoreReference
Indian Council of Agricultural Research (ICAR) – Soil Health Portal: This is a comprehensive resource directly from India’s top agricultural research body. It provides detailed information on the importance of soil health and testing.
Soil Health Card Scheme – Ministry of Agriculture & Farmers Welfare: The official portal for the Government of India’s flagship program on soil testing. It contains farmer-friendly information and guidelines on soil sampling.
National Soil Survey and Land Use Planning (NBSS&LUP), ICAR: This institute specializes in soil science. Their publications often have detailed scientific methodologies for soil sampling.
Vikaspedia – Guide on Soil Testing: Vikaspedia is a multilingual knowledge portal managed by the Government of India. This page provides a very practical, step-by-step guide for farmers in simple language.